
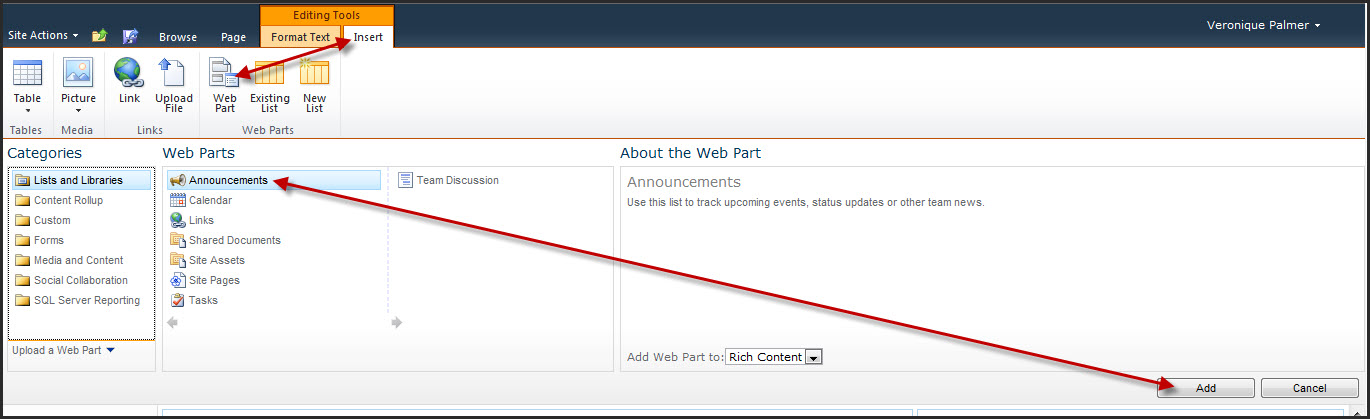
In SharePoint 2010 site pages, the Announcements web part is not a default web part on the landing page like it is in 2007. It has however been created, look under All Site Content. To insert the web part, edit the page.

Then insert the Announcements web part into the page.

Gotcha 1
Don’t delete the default welcome message while the page is still in edit mode.

If you do that, then save the page, the whole web part is deleted and you have to re-insert it. So rather delete the default message after you’ve saved the page.

Gotcha 2
It should be part of your site governance that you always put an expiry date on your item so that when the event / news passes, the announcement no longer displays on the landing page. If you don’t put in an expiry date, you’ll have this endless list of noise all over your landing page. By putting in the expiry date, the announcement will automatically leave the landing page at midnight of that date, and be stored in the library itself instead.

However, the expiry date will not work in the default view that the Announcements web part is inserted in. If I change the expiry date of the above item to yesterday, it should leave the landing page as the item is in the past.


But it doesn’t. It still displays on the landing page.

In order for the expiry date to work, you need to change the default view of the web part. (This also ties to another complaint many users have had – the announcements don’t display a summary of the article like they used to).
Edit the page again, and modify the web part.

Change the Selected View to Summary View and click OK, then Save and Close your page.

Now the announcement is gone, as it should be.

But if you look under All Site Content, and click on the Announcements web part, the item is still listed.

And then if you add a new item with an expiry date in the future…

It will display on your landing page till midnight of that day, as well as a summary sentence of the item.

Gotcha 3
If you insert tables into your announcements to manage images and spacing, the border will always display. It can look a little untidy.

The styles on tables available on site pages is not carried through to the announcements, so you can’t make the lines clear.
![]()
You would need to edit the HTML code to fix it ….. but I’m sorry to say, this is where I get lost. You’re supposed to type in border=”0″ somewhere, but I can’t get it to work in announcements. Must be doing it wrong! 😉 I’m sure the HTML coders out there will get it sorted out chop chop. Would be nice if Microsoft fixed it though. 😉 So barring that, just be aware that the table style can’t be changed like it can in site pages.

Final governance thoughts
Don’t delete your old announcements, leave them stored inside the web part. This is handy for when new people join the team. They can go to the site and read about things that have happened and get a better sense of their new working environment.
Add an Alert Me on behalf of your team for new items so that SharePoint does the work for you. However, if you are doing this on behalf of anyone apart from yourself, do a summary alert were possible; preferably a weekly summary. Be sensitive to people’s inboxes. You don’t want to spam them.
Because people can unsubscribe themselves from your alert without you knowing about it, users could say that they didn’t see you message. This is another reason why you want to leave your announcements in the web part, so that people can’t tell you that you didn’t impart information when you actually did.

I have checked your blog and i have found some duplicate content, that’s why you don’t
rank high in google, but there is a tool that can help you to create 100% unique content,
search for: Boorfe’s tips unlimited content
LikeLike
Hi Doug, once you’ve added it to the site page, maybe go round to the ‘back’ of the announcements list and delete it from there?
LikeLike
I followed your steps but the announcements do not work… I recreated the site and went through it again. both times the “Get Started” Message never went away. What am I doing wrong?
LikeLike
Really? I just tried it now and I can insert an image directly no problem. What version of SharePoint are you using?
LikeLike
Hi All – I agree with all the Gotchas you mentioned.
My users want to just paste the content from a word document to the announcement posts. But the headache they complain about is if the body contains images, they have to first upload the image and then have to come back to reference the image on the body.
If anybody has any workaround or any thought to improve please share.
Regards,
Khushi
LikeLike
Glad to hear it. 🙂
LikeLike
Gotcha 2 – resolved my problem! What a wicked blog post 🙂
LikeLike
Cool. I’m a member there too so will keep an eye out for it. And also if I think of anything that could be causing it.
LikeLike
Thanks Veronique. Will do.
LikeLike
Hi Jennifer,
That is weird. Has someone perhaps changed the default size of the web part? Long shot… What I can also suggest is signing up to http://www.sharepoint-community.net and pose the issue there and include a screen dump so people can see what’s going. Then we can get the whole community to pitch in and help. 🙂
<>
LikeLike
No matter how short or long my announcement is it keeps getting cut off on my home screen. Even if I change the font to a smaller size, I am still getting a sentence cut off with … How can I avoid this? I’ve seen other SharePoint pages where this isn’t an issue, so I know it’s possible.
LikeLike
Hi! I hope someone can help me, Is there any way that you can see how many views a newspost has had in Sharepoint 2010?
LikeLike
Go to the Recycle Bin and restore it Paula.
LikeLike
I already delted the Welcome greeting. How do I get ib back?
LikeLike
Hi Kim,
It happens to people all the time, don’t worry. Glad you found it. 🙂
<>
LikeLike
Hi Livin,
Uhhhm, I’m really not sure! 🙂 Maybe only add 2 items at a time? 🙂 I’d have to ask someone babe.
<>
LikeLike
Hi Stacey,
If you drop me a mail at veronique@letscollaborate.co.za with a screen dump of what you see, I’ll try help you find it. 🙂
<>
LikeLike
I cannot find where the Announcement web part is for the life of me. I have searched everywhere and followed the directions exactly (I can usually enable deactivated web parts easily). I realize this is late, but any help?
LikeLike
Thanks a lot……..
I have one query, i need to display only 2 items how it is possible?
LikeLike
Thank you so much for this post. I did something accidentally and lost the summary view for Announcements. Your screen shots where very helpful. It took me a while because the “properties” box where you drop down summary was way over to the right, such that I didn’t realize that it was there (the whole time!). Anyway, I found it and this post really helped me.
LikeLike
Hi Gio,
I’m not an expert on formulas unfortunately. They totally mess with my head. 🙂 With a bit of luck someone will know and tell you. This is a very popular post on my blog, it gets a lot of hits for some reason, so you might get lucky.
If you don’t, put your question the SharePoint Experts group on LinkedIn. It’s full of specialists that can assist you.
..V..
LikeLike
I have another Gotcha, maybe you have some thoughts. I’ve set an announcement workflow to automatically add the experation date to be 5 days after the item is created. My problem is that I don’t want it to include weekends in the count of days before the item expires. For example, If I create an announcement on Tuesday, it currently expires on Saturday. I want to have it expire on Monday instead skipping Saturday and Sunday. If anyone has any thoughts on this that would be great.
LikeLike
Hi Jason,
I believe you would need to use a content query web part to perform the actions you require. I’m definitely not the expert in that though, those things just confuse me completely. 🙂 Need a techie’s help with that.
LikeLike
I made a ‘Group Work Site’ colleciton and made a ‘Team Site’ which is a sub site of it.
And Announcements Web Part was add on the sub site, Team Site. Is it possible:
If a manager post an announcement on Group Work Site’ announcement list then it appears on Team Site(s), a sub site.
In the ‘Edit Web Part’ of Announcements Web Part, Advanced section, there is ‘Title URL’ option.
I changed this to upper site’s Announcements Wep Part’s URL but did not work.
Am I something worng? I appreciate it if you can give an advice. Thanks.
LikeLike
Hi Gabriel, I’m really not sure, it’s hard to troubleshoot without seeing what you mean. If you like, send me screen dumps of what you’re seeing and I’ll try and help you.
LikeLike
Hello! I can set the views okay, but the view does not change, no matter what style I assign it. What is broken?
LikeLike
Apologies for the delay Lisa.
Did you ever get this sorted out? What browser are you using? Do you have any weird permissions in there?
LikeLike
When I click on an Announcement to open it nothing happens. I’m the one posting them but no one can open them. I selected Summary View but that still doesn’t work. I am usign SP 2010.
Any ideas?
Lisa
LikeLike
Pleasure Nadine! 🙂 Glad I could help.
LikeLike
Thanks Veronique! I was wondering how people got that nice little summary view! Nice post!
LikeLike